Can you believe we’re already at part 6? Just a couple more parts and we’ll be more advanced than the very basics! Today I have a special treat. Lisa, from That Crazy Quilty Girl, is here to tell us all about preparing a quilt top to be quilted by a long-arm quilter. Is she qualified? Oh yes! She’s one of the best quilter’s I know. And I’m not the only one who thinks so. She’s won awards for her quilting all over the country, but most importantly at MQS — the machine quilter’s equivalent of Quilt Market. Not only that but she quilted BOTH samples of Ricky Tim’s and Alex Anderson’s Block of the Month for this year. And one of those she pieced — (seriously, go check it out.) It’s even in the current issue of the Quilt Life!
Without anymore gushing, let’s just say it’s an honor to have Lisa here. Lisa, take it away:
Hello everyone! I’m Lisa, and I’m a longarm quilter. You may have seen my name thrown around Melissa’s site on occasion because she likes to make pretty things, and then I get the pleasure of finishing them for her! I’m happy to be here to continue with you her Basics of Quilting series.
Many people think that when their top is completed, their work is done. That couldn’t be further from the truth! But I’m here to help make it a little easier for you (and your quilter). I may get a little long-winded and if I do, I apologize in advance! I can’t offer much advice on preparing your quilt to quilt it on a domestic sewing machine, as I’ve only done just a few small projects (usually quilting fabric to make into a bag) on a domestic. However, I can give you all kinds of tips and tricks for preparing your quilt for a longarmer. Please bear in mind that each longarmer is different and requests different things, so it’s best to check to see how they’d like your quilt and backing prepared. It is my job to make my customers’ quilts look as best as they can. But I can only work with so much. I always start out by loading every quilt square (some longarmers do NOT load square, but flat, which is a big no-no).
Once I’ve loaded it, I know what types of issues, if any, I will be dealing with before I even take the first stitch of quilting. The first piece of advice that I can give you is to follow the “rules” that Melissa mapped out for you in all of her previous entries of this series! Following the rules of quilting to construct your top is the number one way to be sure you will be happy with the end result (after quilting). Whether you’re more of a traditional or liberated quilter, the best rule of thumb is to always square up as you work! If your quilt top has a lot of problems in the piecing, it can affect all kinds of things. Including it not getting quilted the way you’d like. Precautions need to be taken for errors in piecing, whether you or your quilter like it or not. If “the rules” are not followed, all kinds of things can go wrong. You can end up with fullness, a quilt that’s 10 inches longer on one side, puckers, pleats, tucks (I personally have never, nor will I ever do a tuck… if I can’t work it out then I will fix it), etc. Why would you want that? Properly attaching borders is the most overlooked of the rules. And also the most catastrophic. Would you like to see what it looks like when a longarmer loads a quilt square on the frame, but the borders weren’t attached properly? I’ll show you. And if you’re not horrified by what you see, you have no soul. KIDDING! But I was horrified. And that takes a lot.
That’s a whoooooooole lotta fun right there. It takes SO MUCH time and extra effort to quilt something like that without pleats or intentional tucks (and apparently very few can, my friends on Facebook were amazed when I was done with this puppy, it turned out beautiful!). On this particular quilt, my customer didn’t measure for her borders, but “sew and slashed” them, which not only allows you to stretch your fabric, but distort it as well. In this picture, there is too much fabric for the border. In the next picture (same client), there’s not enough, which leads to a whole lot of fullness within the body of the quilt. Again. Horrified. This picture doesn’t even accurately illustrate how bad it was, because it wasn’t this one section. The entire quilt looked like this:
And another one. SAME client. Again. Before:
And after:
That’s a lot of work! Which takes a lot of time. Which will cost you more. So do yourself a favor and follow Melissa’s suggestions. 🙂 Now! Other things that you don’t typically think about: Thread tails and fabric fray on the back side of your quilt. If you have a lot of light colored fabrics, you should always take the time to remove frays and clip thread tails from the back side of your quilt top. You would really be amazed how much it shows through once it’s quilted. Removing stray threads and frays that have creeped up through your seams and made their way to the top of the quilt top. This seems like I’m being picky, but I’ve spent up to 45 minutes removing threads (and pet hairs, etc.) from someone’s top. My time is my most valuable resource! (Ask me how long my waiting list is)
If your top has no borders, say a whole bunch of squares sewn together, it’s best to “square up” the outer edges of the top. By this, I mean to trim off any excess fabric that may have sneaked past your seam, so that there is a nice, straight line along the edge of your quilt. When we’re loading the top onto the frame, we need to have a point of reference, to which we load it square. Having trimmed edges helps tremendously! Press your quilt top before dropping it off. This seems like a given but… yeah! I love an embellished quilt, but wait to add any embellishments (yo-yos, crystals, buttons, anything 3-D) until after it’s quilted. I learned the hard way that it’s nearly, though not entirely impossible to quilt an embellished quilt. The hopping foot can sometimes catch on the embellishments and you then run the risk of a tear in your top. Nobody wants that!
If you’d like to supply your own batting, be sure that it’s a good quality batting. If you question whether or not your batting is a good quality, discuss it with your quilter. We have to follow rules with battings, in that certain battings have to have a minimum amount of space between stitching. Some of the low quality battings can leave a quilt limp and lifeless and it may be gross and bunchy after it’s washed. Yuck! Remember to never baste your layers together before dropping off with a longarm quilter. Quilting on a longarm is a whole different ballgame than on a domestic and each layer must be loaded individually.
While we’re on the subject of loading layers, another really, super-duper important thing is to always provide a backing that is LARGER than your quilt top. The way your quilt gets loaded onto a longarm frame, your quilter will need an absolute minimum of three extra inches on each side. The amount of fabric that each quilter prefers varies. For me, it depends on what type of quilting will be done. Some quilting requires more fabric than others. I usually prefer at least five inches of fabric on all four sides of the top. (For what it’s worth, when I’m quilting my own quilts, I do eight extra inches on each side to be sure that I end up with the absolute best results possible) It’s a good general rule to add 10 inches to your width and lenth and buy that much backing. So if your quilt top measure 90×108, you would need at least 100×118 inches of backing. Another important rule as far as backing goes is that it must be square. I don’t mind so much if the quilt top isn’t square. However, if your backing isn’t square you’re just begging for trouble! If it’s not square it can twist on the frame. If it twists on the frame, your quilt will also twist when it comes off of the frame. Un-square backing can cause serious pleats as well. And, if it isn’t square, there’s a chance that once I get to the bottom of the quilt, there may not be enough on one side (this is a big reason why I started basting them square before beginning the quilting!). Now I’ll show you the difference between a square and non-square back.
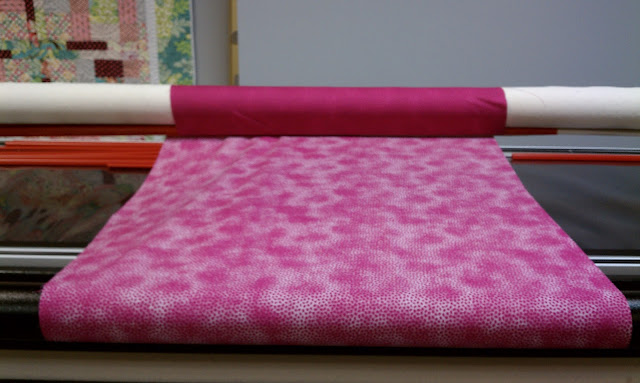
That beauty up above? That’s a square back. It has an even tension all across the frame. When the back is loaded onto the frame, I first find the center of the top and bottom and work my way out to each side from there. It is very important to have a square back so you don’t end up with:
A sad back. Do you see how it’s all droopy on the left side? There’s nothing your quilter can do to help that. Except straighten it. Which will likely result in not enough backing. It is always best to tear your backings along the straight of the grain by clipping into the fabric just past the selvedge and then tearing it all the way through the selvedge on the other side. If you buy wide backings at your local quilt shop, ask them to tear it. If they don’t/won’t tear it you should 1) probably look for a different favorite local quilt shop! And 2) buy anywhere from 1/4-1/2 yard extra to account for the fabric you’ll lose once it is straightened. If you like to piece your backings, whether you sew a single seam to join two big strips of fabric, or like to make your quilts reversible by piecing blocks together, etc. it is best to follow the regular rules of quilting *except one!* That one rule you shouldn’t follow when it comes to backing, is the 1/4″ seam rule. For a backing, it is best to use a 1/2″ seam allowance and press open. There are a few reasons for this. Your backing is the most “abused” during the quilting process. It gets stretched between rollers, across the frame, and with the clamps on the sides. A 1/2″ seam allowance helps to keep everything where it should be until it comes off the frame. There’s more fabric in the seam allowance, which helps keep the seams from coming apart. If the seams start to come apart, your nice and square backing becomes a non-square backing and can cause weird humps or waves in the quilt once it’s finished. Pressing the seams open helps to eliminate unnecessary bulk within the quilt sandwich. Longarms can be kind of picky, they like uniformity! Sometimes a little added bulk can result in skipped stitches, shredded thread, etc. Now that I’ve managed to be the bad guy for an entire guest post, it’s time for me to tell you: It’s okay. Don’t be discouraged if everything isn’t just right. It’s my job, and my responsibility to tell you how things are *supposed* to be. If you have a good quilter, any “problems” can be overcome (except for the not enough backing part… so, so important!). There is no such thing as a perfect quilt, and your quilter doesn’t (or shouldn’t) expect perfection if they can’t also deliver perfection. I’m giving you permission (as if you need my permission!) to “fudge it” every now and then. It isn’t the end of the world. Quilting is supposed to be fun. Have fun!
Wow, Lisa! I learned a lot. I hope all of you did too. Thank you so much for instructing us today.
Love,
